Tuesday, July 15, 2008

Get things done with Gnome Do


Gnome Do is a quicklauncher for Linux. Although the name implies it is a Gnome application, it apparently works just as well in XFCE4 or KDE. Similar to the search feature of Opera (which remembers visited websites and content), Do allows you to quickly search for items in your desktop environment and perform useful actions on those items. Do is inspired by Quicksilver and GNOME Launch Box.

You launch Do with Super+Space. Then, if you want to send an email to John, simply type "email john." If you want to listen to Radiohead, type "play radiohead." Also, Do is able to learn from your previous actions. Therefore, if you for example use the Opera web browser often, typing "o" in Do will launch it.

Ubuntu 8.04 Hardy installation instructions:

1. Add the Gnome Do PPA Repository to your sources list.

deb http://ppa.launchpad.net/do-core/ubuntu hardy main
deb-src http://ppa.launchpad.net/do-core/ubuntu hardy main
2. In Synaptic Package Manager, search for 'gnome-do' or install it from the terminal:
sudo aptitude update && sudo aptitude install gnome-do

More information about this nice, fast, and lightweight application can be found at the Gnome Do wiki.

Tuesday, July 8, 2008

How to change the scrollbar background in Opera 9.50

The scrollbar in Opera is hard to discriminate against its background. One possible option is to increase the contrast by changing the scrollbar background to a darker colour or theme, for example the same background used for the pagebar background. The following steps show how to do it:
  1. As root, open the zip-file containing your current Opera skin. The default skin can be found at /usr/share/opera/skin/standard_skin.zip, while downloaded skins can be found at /home/username/.opera/skin/*.zip.
  2. Inside the zip-file, open the image /backgrounds/pagebar.png with an image editor such as Gimp. 
  3. Rotate the image 90 degrees clockwise and save it as /backgrounds/pagebar2.png inside the zip-file.
  4. Open skin.ini from the zip-file and use Ctrl+F to go to the line containing
    [Scrollbar Vertical Skin]
    Underneath this heading, modify exisiting lines as 
    Type = BoxStretch
    Tile Center = backgrounds/pagebar2.png
  5. You might want to change the horizontal scrollbar background too. Repeat Step 4 but use the original pagebar.png (not rotated). Go to
    [Scrollbar Horizontal Skin]
    Underneath this heading, modify exisiting lines as 
    Type = BoxStretch
    Tile Center = backgrounds/pagebar.png
  6. Save skin.ini inside the zip-file and restart the browser.

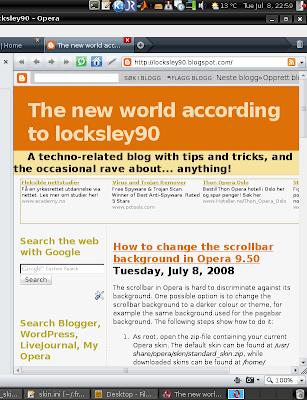
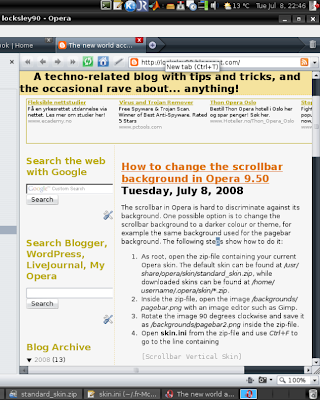
The following screenshots shows the scrollbar background before and after the change:


You may also be interested in the following posts:

How to change the background of Speed Dial in Opera 9.50

Add more speed dials and remove search field in Opera 9.50

Friday, June 27, 2008

How to change the background of Speed Dial in Opera 9.50


Updated 2 September 2008:
To change the background of the Speed Dial tab in Opera 9.50, you need to do the following:
  1. Go to Tools --> Appearance --> Skin to find out which skin you are using. If it says Opera Standard, you are using the default skin, otherwise, you are using a downloaded skin. Note the name of the skin.
  2. As root, open the zip-file containing the Opera skin that you are using. The default skin can be found at /usr/share/opera/skin/standard_skin.zip, while downloaded skins can be found at /home/username/.opera/skin/*.zip. You can use the following command in a terminal:
    sudo gnome-open /usr/share/opera/skin/standard_skin.zip
  3. Open the folder /backgrounds in the zip-file by double-clicking it.
  4. Open a file browser (Nautilus) and locate a background image that you want to use, e.g., /usr/share/wallpapers/triplegears.jpg.
  5. Add the background image (triplegears.jpg) to the /backgrounds folder by pressing the Add Files... button and locating the image.
  6. Open skin.ini from the zip-file and scroll down, or use Ctrl+F, to go to the line containing
    [Speed Dial Widget Skin]
    Underneath this heading, add 
    Type = BoxTile
    Tile Center = backgrounds/triplegears.jpg
  7. Save skin.ini inside the zip-file, click "yes" to update the  archive, and restart the browser.

Note that your newly installed background image for the Speed Dial tab may be affected by the current color scheme. In my case, the background image became very bluish because the color scheme was set to system colors. To avoid this, go to Appearance (Shift+F12) and make sure Color Scheme is set to No color scheme.

Some screenshots:

1. Determine the skin you are currently using:

2. The zip-file containing the skin:

3. The /backgrounds folder in the zip-file (note Add Files button):

4. Locating a suitable background image using Nautilus:

5. Click Add Files in the /backgrounds folder (see 3. above) and  add the background image:

6. Edit the file skin.ini to use the background image by adding the two lines in blue:

7. Save skin.ini and click "Yes" to update archive:

Add more speed dials and remove search field in Opera 9.50

By default, Opera 9.50 comes with 9 speed dials when you open a new tab. However, you may have a screen size and resolution that would accomodate more speed dials. For example, to get 4 x 3 speed dials, do the following:

  1. Go to Help → About Opera and note the path of your main Opera directory (look for the opera6.ini file), usually /home/username/.opera/.
  2. Make sure Opera is not running, then open speeddial.ini from this directory and add the following three lines:
    [Size]
    Rows=4
    Columns=3
  3. Start Opera and note the change.
You can still open the 9 first speed dials using Ctrl+n, where n=1-9. To add shortcuts to the other speed dials, follow this guide.

To get some extra space, you can turn off the search field the top of the Speed Dial page. Enter opera:config#UserPrefs|SpeedDialSearchType in the address field, hit Enter, and replace the value with 0. Scroll down to the bottom and click Save.  The changes will take effect immediately without restart.

Thursday, June 26, 2008

Using Linux to scan and remove viruses from a Windows computer

A common problem with viruses is that they are often extremely difficult to remove. Most of the time, you easily understand that there is something strange about your Windows box (apart from the usual Windows behaviour, that is :D) , so you run a virus scan and indeed, confirm your worry that you have been infected. But what is the worth of your antivirus application if it is unable to remove the virus, not to mention detect it in the first place?! Often, you need to find a dedicated mini-application that removes a particular virus, but if you can't, you're screwed.

The following is a recipe that works:
1. Install Ubuntu 8.04 (Hardy Heron) Persistent on a USB stick (see this guide, and read my reasons why)
2.Install antivirus applications on the Ubuntu system on the USB stick.
  • Avast Antivirus is easy to install (.deb available) and is free but requires email registration for a key (no spam).
  • Clam Antivirus is free and also available from repositories (enable universe). If you prefer a graphical user interface (GUI), also install clamtk using Synaptic.
  • AVG Anti-Virus Free for Linux/Freebsd 7.5.50 is not their latest release but might do the job.
  • Trend Micro HouseCall is a free online scanning service. Linux distributions must support libc6.
3. Make sure the antivirus applications and virus definitions are all updated.
4. Boot up Ubuntu on the infected Windows computer using your USB stick. You may have to enter the BIOS setup to change the boot order to boot from USB before booting from the (Windows) hard drive.
5. Launch an antivirus application in Ubuntu and tell it to scan the directory /media, where the windows partitions shall have been automounted as /media/disk, /media/disk-1, etc. at boot time.

(Note: I have only tried Avast and Clam. I noted that Clam seemed to be unresponsive upon starting a scan, but after 30 seconds or so started scanning.)

When you have successfully cleaned your mom's/dad's/friend's computer, lend them your USB stick (with all the usual snacks like Compiz Fusion/the 3D cube, OpenOffice, Opera 9.5 with email set up, Amarok, VLC player etc.) and tell them that anything they can accomplish in Windows (well, perhaps with the exception of premium video editing suites such as Adobe Premiere Pro) they can do with free software in a virusfree Linux environment!